We have fully reworked our template feature
Did you know that our template feature is one of the most integral parts of the Smartplan system? The template has been a part of Smartplan more or less since day one. As of today we have expanded the functionality of this feature even further.
We know by years of experience, that a template is one of the most powerful tools for making shiftplanning processes more efficient. Especially when it comes to saving time. After initially having invested a little time on building a basic framework for your predominant shift patterns, these basic templates will then save you tons of hours of work later on. With a customized template it just takes you a few clicks and you will have a basic rota ready to be staffed. You can even save a default staffing as part of your template and then just make minor adjustments whenever you use it. This reduces your time and effort to a bare minimum.
Even though our template provides such a powerful support for our customers’ daily shiftplanning, we knew there was still room for improvement. The past weeks we have worked very hard in order to be able to offer you a completely revamped version of our Smartplan template feature. This will hopefully improve the usability and usefulness of the overall feature to your advantage.
Let us dig deeper into what the new template logic entails.
Introducing: Our new Template Manager
Usually, when setting up templates in our planning tool, you were already able to save your current templates and then inserting them again into another rota at a later point. And that is of course the most important part of the overall feature. But it had two main drawbacks:
- It was not possible to make minor adjustments to already saved templates. So in order to update your template you would need to insert the template in question into a random rota, make the changes and save it as a new template.
- Outdated templates, that were not needed anymore, could not be deleted. This could only be done internally by our Customer Support team. Because of that, many customers would end up with endless lists of template versions of which they would actually just use a handful.
These two limitations of course reinforce each other and led to many inconveniences, not only for you as a costumer, but for our Customer Support team as well.
That is why we have developed a brand new Template Manager, which will not only give you a complete overview on all your current templates, but also give you the option to edit those templates and archive them, if needed.
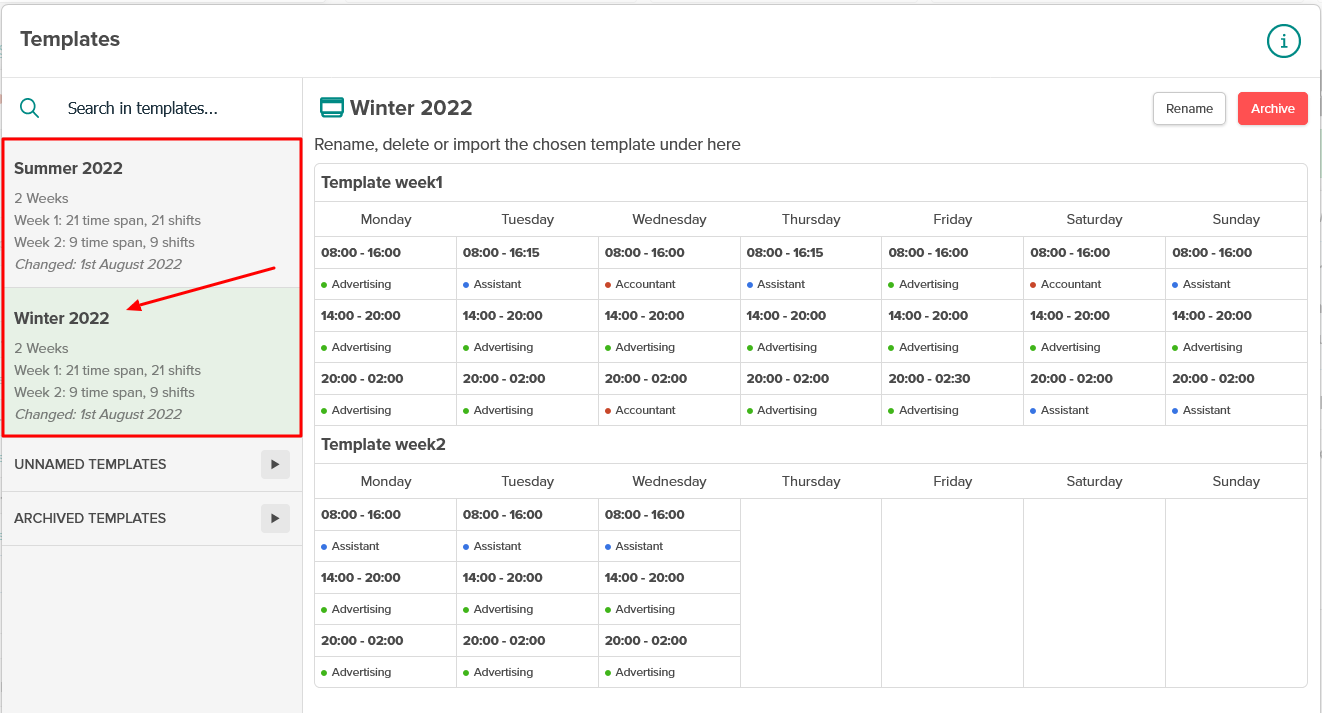
This is how it looks:
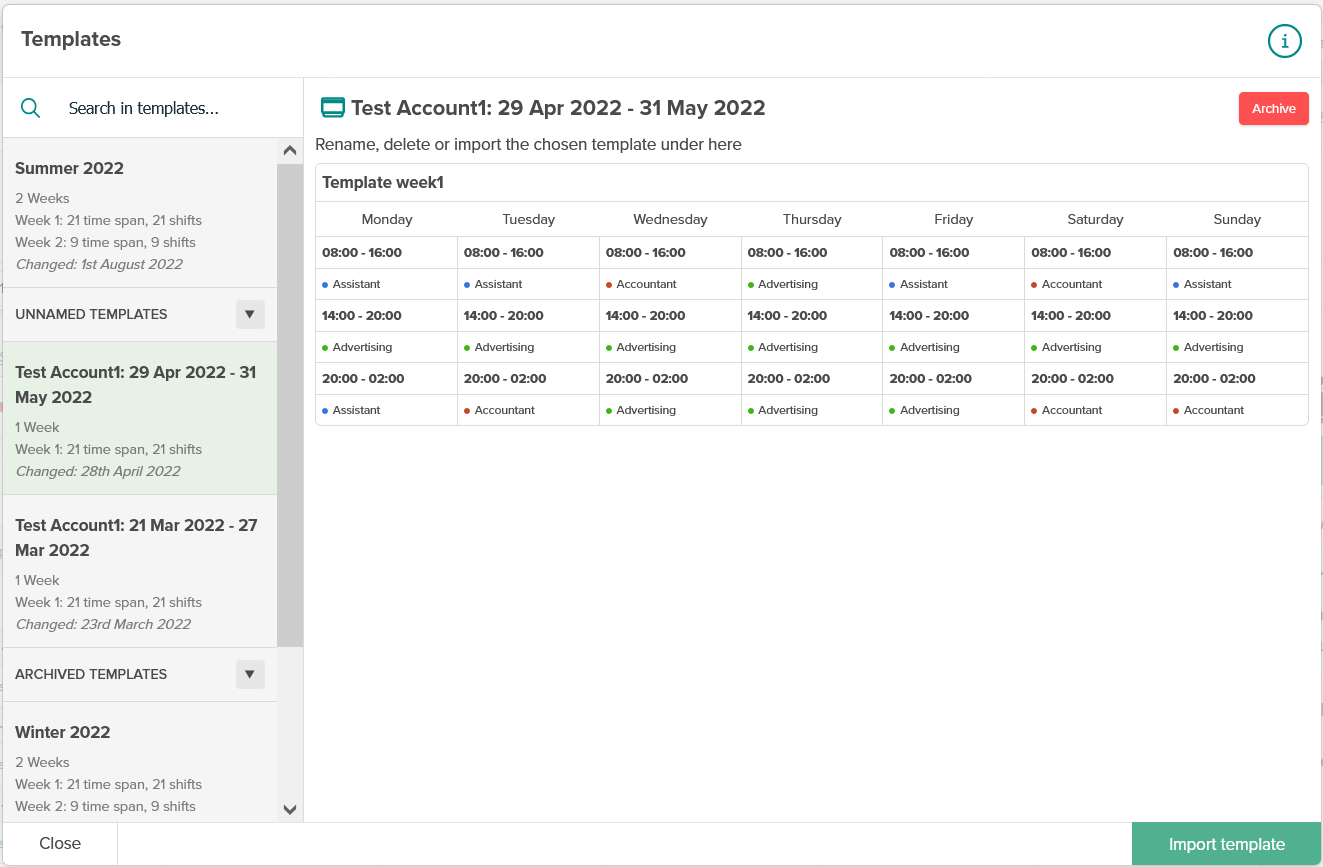
On the left, you are presented with a list of all the saved templates for your account. In order to be able to find the desired template more quickly, there are a few details displayed as well. This includes information like the template title, its length (in weeks), its content and its most recent edit.
Your templates are grouped in 3 categories:
- Titled templates: These are the templates that you have consciously and deliberately saved for later use. In the process of saving those templates, you have given them a title of your choice.
- Unnamed templates: If you create a new rota and start a new template in it, but do not save it, we are saving it for you anyway. So in this category you will find all the templates that you created at some point, but did not save. Just in case.
- Archived templates: When you choose one of your templates in the list and decide to archive it, it will not be completely deleted. You will find these archived templates in this 3rd category, where you can take a look at them again and restore them, if needed.
In order to import one of your templates to your current planning modal, just choose the according template from the list to the left and click on the button “Use template”. By importing a template from the Template Manager, any content that you may have created in the template tool beforehand, will be overwritten.
Template versions
We are intentionally not providing you with a template editor, because that would mean that you would simply overwrite the original version. So you will not be able to alter the templates itself inside the Template Manager. We have come up with a much better solution.
When you open a rota and go to the template tool, you will now see the following three buttons:
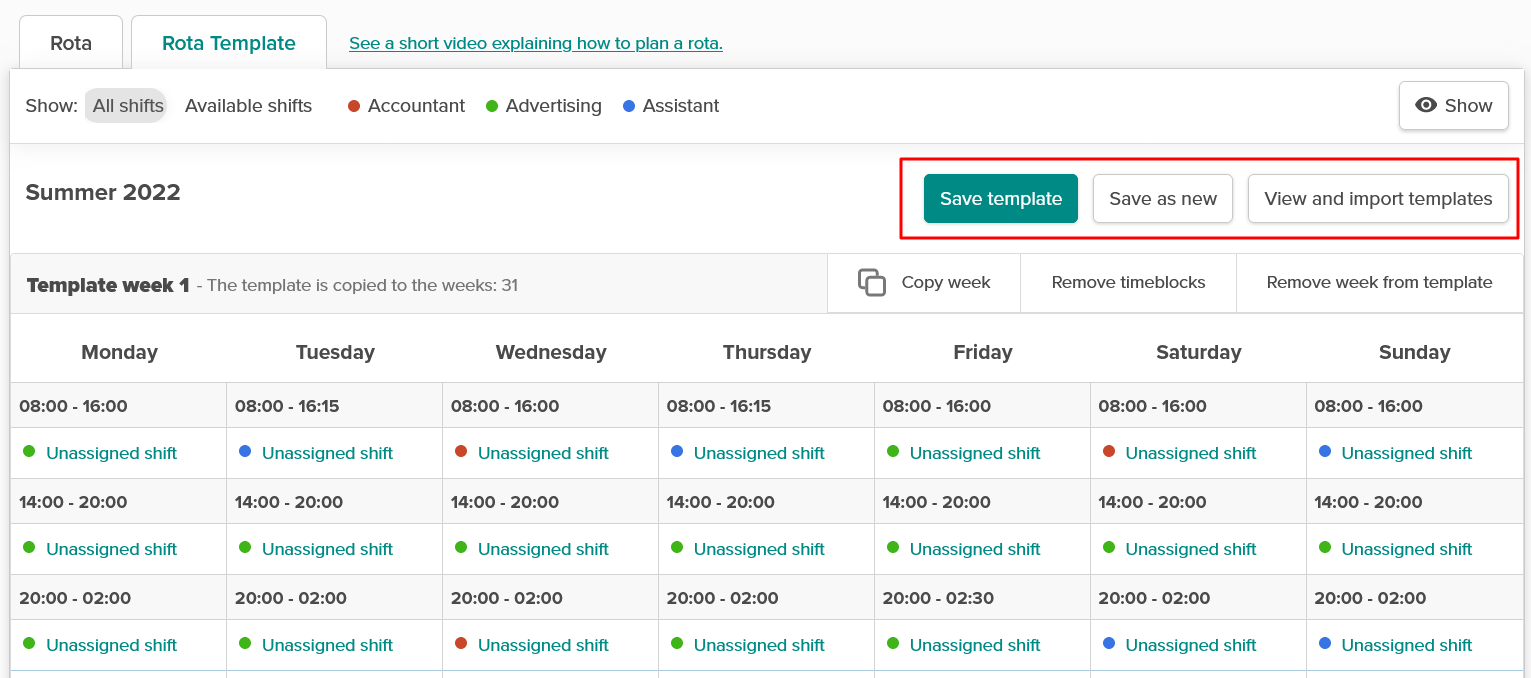
If you want to edit a specific rota, the first step would be to click on “View and import templates” in order to open the Template Manager. As described above, you would then choose the respective template, that you want to adjust and import it to the template tool.
Now that you have imported the template, you can go ahead and change it as much as you want. This will not alter the original template at all. As soon as you are finished with your adjustments, you now have to decide between two options.
Save template
The first option is to click on “Save template”. This means that your edited version will simply be saved as the latest version of this template. It will be connected to the former version and appear as the new original of this template.
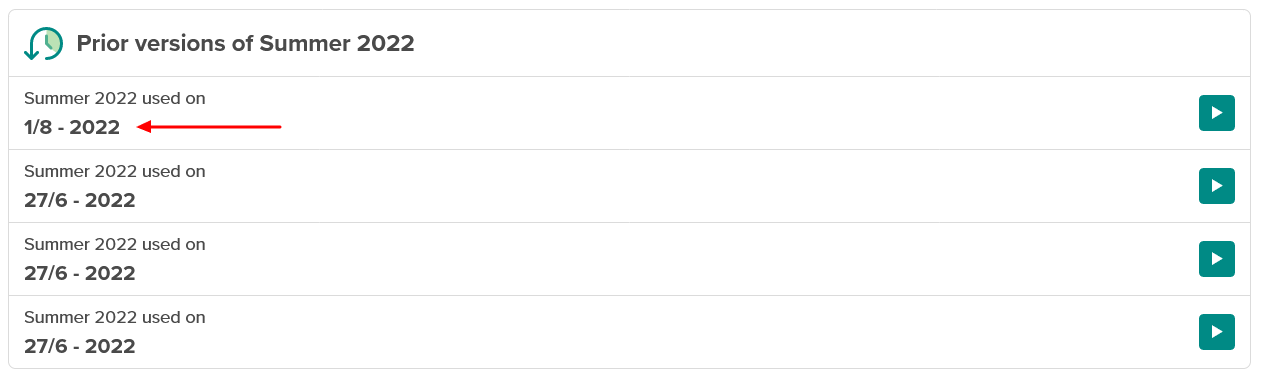
The advantage of creating new template versions instead of simply overwriting existing ones is twofold. First, for documentation purposes: You will be able to easily trace back, when exactly changes to the template have been made and what has changed in relation to the former version. Second, it makes it possible for you to access your earlier versions in case you are not satisfied with the latest changes you have made to the template.
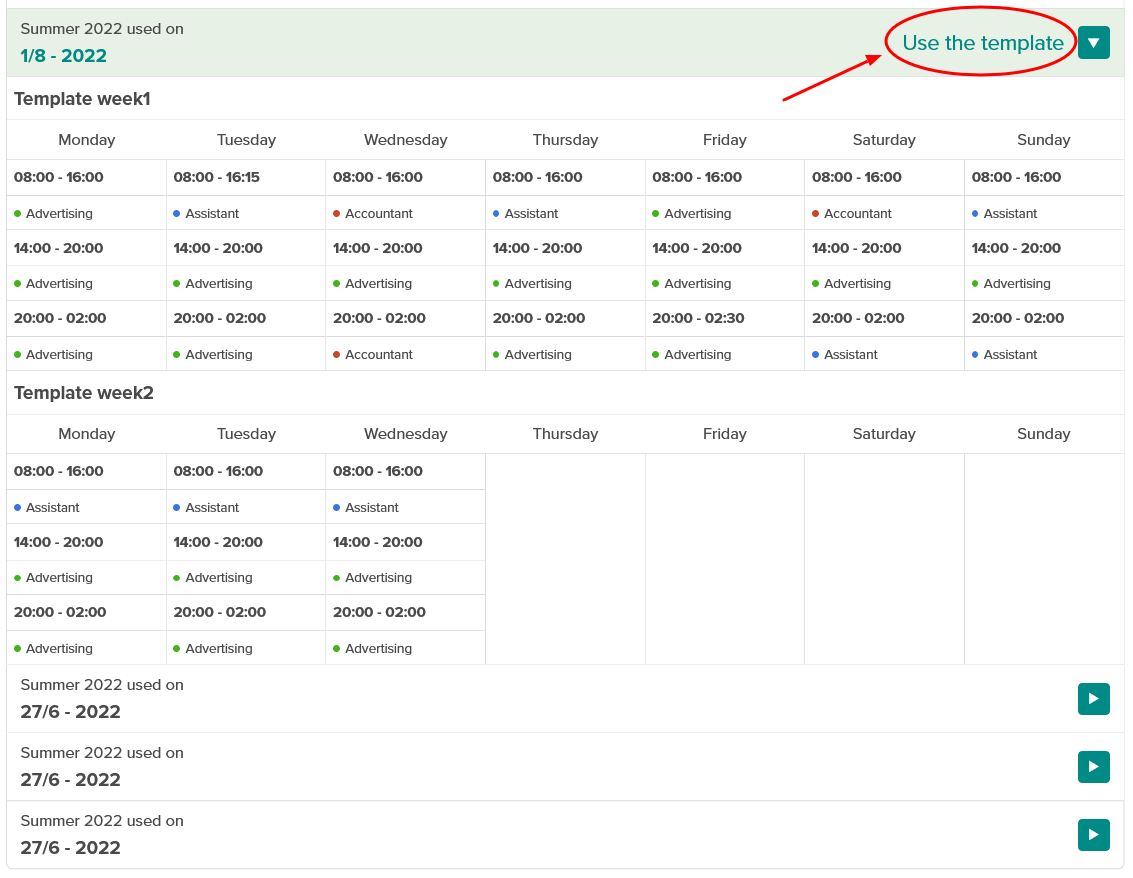
All the versions of a given template are stored safely in your Template Manager. If you preview the respective template in the Template Manager, you will also be able to see the different versions of that template. You will be able to import any of those versions as you like and use it instead of the current original:
Save as new
When you have edited an already saved template, you do not necessarily have to save it as a new version of that template, but you can even save it as a completely independent template. Just click on “Save as new”. In order to save it as a template of its own, you first have to give it a new title.
As soon as it is saved, it will appear in the list of titled templates together with all the others that you have saved so far. It will be the first version of a completely new template.
This option makes sense, if you want to create separate templates for different work departments or job positions and these departments or job positions have very similar shift patterns. In that case, the easiest thing to do it to create a template for one of them, save it, and then use said template as a draft for your other departments. You can adjust the original template so it fits the specific work conditions and then save it as a template of its own.
What is your opinion?
We hope this “makeover” of our template feature will make it a lot more versatile and intuitive for you to use. The initial advantage of the template was that it could save you a lot of time when setting up new rotas. But with this update you will now even save time in the process of creating the templates itself. Edits and the creation of new template versions can now be done in a matter of seconds.
We are very excited to learn more about your experience with the new Template Manager. We would appreciate, if you give it a try the next time you are working on your shift planning and share your thoughts with us.
You can always reach us by starting a chat in the lower right corner within your Smartplan account or by writing us an email to support@trysmartplan.com.
Create your online staff rota in minutes. Try Smartplan for free.
Signing up means agreeing to our terms of use.
Smartplan is a perfect match for your business
It’s easy to switch
Whether you’re currently using scheduling software, Excel or even a pen and paper, switching to Smartplan is quick and easy.
It just works
Smartplan combines a simple, user-friendly interface and powerful scheduling tools to create a system that just works.
Take care of your bottom line
We’ve ditched unnecessary frills and functions to give you the most cost-effective solution.